
This post may contain affiliate links and I will be compensated if you make a purchase after clicking through my links See Full Disclosure Here
Summer is upon us; pool parties and backyard BBQ’s are in full swing. I’d like to share with you a new cake and cake pop tutorial that is all BBQ inspired! This cake is super easy and incredibly fun. And completely achievable for all levels of bakers. It’s a DIY BBQ Cake and Cake Pop tutorial and I hope you enjoy it!

Before we get started on the design of your cake and matching pops, let’s talk about what you’ll need and the cake itself.
For this DIY project you will need:
Chocolate Cake
Peanut Butter Buttercream
Chocolate Buttercream
Wilton White Fondant
Wilton Blue Fondant
Wilton Edible Markers
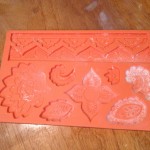
Wilton Pasley Fondant Press
Rolling Pin
Fondant Paddle Smoother
Powdered Sugar
3 1/2 in length Pop Sticks
Candy Clear Cello Bags
Twist Ties
Candymelts in Vanilla/white and Blue colors
Package of white candy liners
14 in diameter cake board
Gingham/picnic table liner
3 plastic containers, deep enough to dip cake pops into melted chocolate

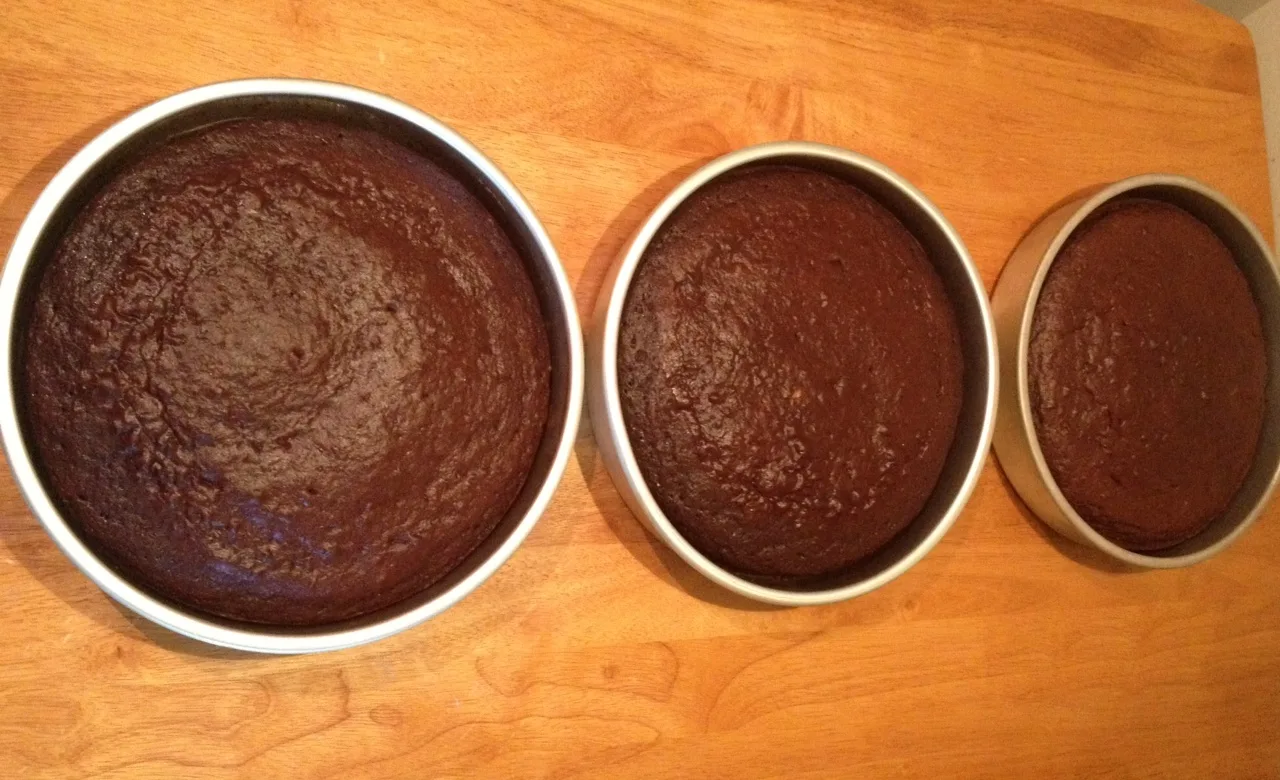
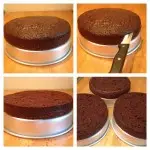
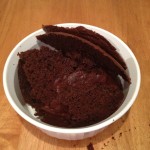
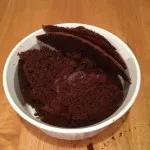
I used a classic Chocolate Cake recipe and baked it as three layers; for those of you who are not so inclined to bake from scratch, any store bought box cake will do just fine. You can bake your cakes several days in advance and either freeze them or keep them in the refrigerator. Being a mom to two young boys, my windows of time are quite short. So on Day #1, I baked the cake and leveled them off. Leveling a cake means to cut the top dome off to make each layer flat for icing and stacking. TIP: after your cakes have cooled to room temperature, remove them from your pans and place them in the refrigerator for about 30 min. This will make it easy for you to level the cakes off. Cooling your layers provide firmness and allow for easy cutting.

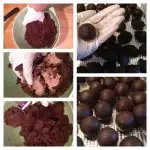
Also on this day you want to save the excess cake and crumble it up. This will be used for your cake pops. Chill crumbed leftover cake.
Day #2, I made a batch of peanut butter buttercream icing.
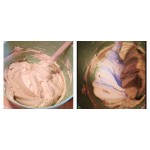
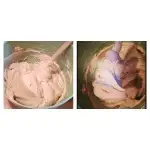
Remove the chilled crumbed cake and add approx 2 TBSP of buttercream and knead together. The consistency should be of “Playdo” feel. Use a cookie scoop or ice scream scoop, so your cake bites will be a consistent size and begin to measure out your bites, roll them and place them on a cookie sheet lined with parchment paper. Once you’ve rolled all the bites, place the cookie sheet of rolled bites into the refrigerator to firm up.

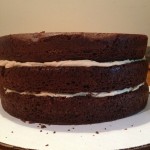
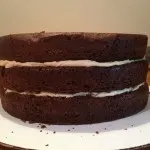
Day #3, I assembled and decorated the cake. Spread enough buttercream on two layers of cake. You want to make sure each layer has the same amount of buttercream. TIP: I apply buttercream evenly to my layers, this helps in measuring consistency. For every spoonful on one layer should be matched for each layer you are icing.
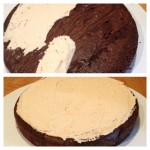

Once you’ve completed evenly spreading the buttercream, begin to stack your layers. Be sure they line up flush, if you make a mistake, simply and gently shimmy the layer to line up with the bottom layer.
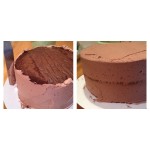
Once assembled, soften your chocolate buttercream and begin to cover your cake. The reason for this step is to fill in the gaps. We in the business call this a “Crumb Fill”. You want to make sure you smooth a thin layer of buttercream onto your cake to provide filling of the cracks. This is a major step before you apply your fondant. Once completed place your covered cake into the refrigerator.

Place white candy melts into one plastic containers and blue in another. Melt each separately. Start in 30 second increments until all the chocolate is melted. This is a slow process because you DO NOT want to burn your chocolate. There is no recovery once it is burned. TIP: When stirring your melted chocolate you notice it is very thick, add a tsp of shortening and stir it in. The oil will melt and incorporate into the chocolate diffusing the thick consistency. Now that you have two different colors of melted chocolate, take the third plastic container and add half of the white and half of the blue into it. Take a knife or tooth pick and swirl it around. This will create the marble effect for the cake pop.
Remove your chilled tray of rolled cake bites, dip the tip of the candy stick into the melted chocolate and insert it into the top of a cake bite. Do this step for all rolled cake bites. The chocolate will take seconds to set. Once they are set, take a pop, dip it into the chocolate, gently tap it on the side of your finger to allow for the excess chocolate to pour off and then place the dipped pop back on its flat side. NOTE: This is what I call a non traditional cake pop, but still very eye pleasing and very easy for display.
Once you have dipped all the pops, allow some time for them to set properly. Please remember while doing this, you will want to work in a cool area; this will allow the chocolate to set. Because it’s summer, and depending on your geographical location, humidity and a warm environment in not friendly.
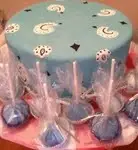
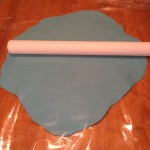
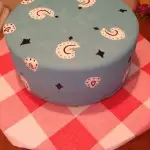
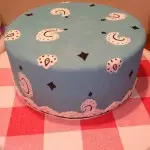
Day #4, today we will dress your cake. I chose a bandana design. It’s simple and can be made from any color, if you choose not to use blue, and a bandana is a BBQ! Take out your white and blue fondant. Mix the two to achieve a desired color. You will need to knead your fondant to create elasticity. You will need a clean, flat surface and sprinkle it with a thin coating of powdered sugar. This prevents the fondant to stick to your table. You need to measure your cake. Measure the height and multiply it by 2, measure the length of your cake across the top and add it to your first number and add 3. This number is the diameter measurement for your rolled fondant. Using your rolling pin, begin to roll out your fondant into a large circle. TIP: When rolling fondant, you not only want to keep powdered sugar close, and apply it between your table frequently, but you can place a piece of parchment paper between the fondant and rolling pin. This will help to keep the fondant moving without sticking to your rolling pin.

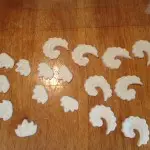
Using your fondant press, begin to press out the desired designs. Make them in quantity and cover them with saran wrap to keep the fondant moist. You can certainly do this step ahead of time, but you will want multiple press designs ready for the cake dressing.

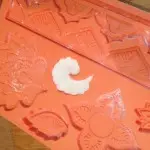
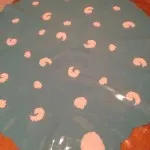
Remove the parchment paper and begin to place your pressed designs. There is no pattern for this, place them as you see fit. Once you’ve placed all the pieces down, place the parchment paper back on top, take your rolling pin and gently roll over the fondant. What you are doing here is creating a layer that is flush to the larger piece. It creates a single pattern. Once completed, remove the parchment paper, take your rolling pin and starting at one edge, gently roll the fondant

Remove your cake from the refrigerator, using a water mister, spray your cake all around. The water acts like a glue for the fondant. Take your rolled fondant pin, and roll out the fondant onto the cake. You want the edge of the fondant to be approx 2 inches from the base of your cake. You want the sides of the fondant to be drappy and loose. Take your smoother and with light pressure smooth the top of the cake. Using your hands, rub some powdered sugar on them, begin to smooth down the sides of the cake. Do not be scared to apply some pressure. you will want to pull out the loose fondant with one hand and shimmy down with the other. Once you are done, cut the excess fondant off with a pizza cutter 🙂
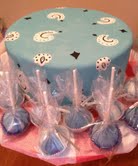
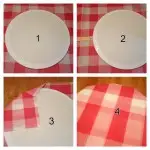
Take your board and cut out a round piece of the gingham table liner and tape it to your board. The reason the board is larger than your cake, the board will serve two purposes. 1) display your cake 2) display your cake pops

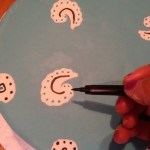
Place a small dollop of buttercream in the center of your covered board. Using a spatula, gently place your dressed cake onto the center. This is to prevent your cake from moving. Next, using the edible markers, you want to add depth and small designs to the cake.
Place your finished cake into the refrigerator to chill and set. TIP: When placing your dressed cake into the refrigerator make sure there is no moisture blowing on your cake. Moisture will melt the fondant. TIP: If your cake has powdered sugar on it, you can either use a clean brush to brush it off, or you can use a travel clothes steamer and steam the cake. In using this method be warned and careful that the steam, which is HOT, is not directly close to the cake. Just steam it lightly.

Take your set cake pops, place a liner, then into the cello bag and twist.
Day of BBQ: Look at the weather and decide on placement and display of your cake. Humidity, heat and rain are enemies! If there is no tri-fecta happening you can place the wrapped cake pops on the board surrounding your cake… cut, pick, eat and enjoy!!
You, by no means, have to follow my extra prolonged, child-approved schedule. But if needed, you can certainly spread this project out over several days.
Happy Baking and Decorating!
Until next time, I am Gina Gray of GG Cakes
[jetpack_subscription_form]